A few words about the knives. Funayuki are today less popular than deba knives. In their construction they are not quite as strong & thick as deba knives. The knives in question weight about 150g with their original handles while a 165 mm deba would weight 200 - 250g.
 |
| Two 165 mm funayuki knives. |
Since the knives were on the cheap side (which is in general not a good idea with single bevel knives as these are harder to make than knives with symmetric grind) the handles ware not too nice, just simple Ho-wood (which would be fine) with plastic ferrules (which I can not stand). So I though it why not use the occasion to improve my handle making skills :)
I have decided to make handles with 5 mm thick brass bolster and one piece of wood, this had implications on how the handle was makde.
As I started to work on the knives I found some more things to change or tweak, so here is a full list of what was done:
- Remove the old handles (easy, as these are not glued)
- Square up the 'shoulders' so there would be a nice fit with the bolster
- Grind the tang to remove the scale (the original handles were burned-on) and rust.
- Round the spine and choil (the choils were realy nasty sharp
- Make the bolster (nice and tight) and finish the front face
- Drill the tang and make sure it fits nicely against the bolster
- Rough shape the bolster before the handle will be glued (and watch for the heat!)
- Glue up the handle
- Shape the handle
- Sand the handle and bolster
- Apply a few coats of Tru-oil
Handle design
This time I have decided to go with different handle than what I did so far. I would make a bolster from 5 mm thick brass plate which would be made to fit tightly onto the tang and then the handle would be made from one piece of wood. The challenge was that the handle would be shaped AFTER it was already glued with epoxy onto the tang.
But let's get started ...
Materials
- Mora wood (from dictum.com) in 25 x 25 x 150 mm
- Purple heart wood (also from dictum.com) in 25 x 25 x 150 mm
- 5 mm thick brass plate
- 0.8 mm thick black fibre spacer
- G/flex epoxy
Tools (apart from the obvious)
- Wooden block with opening large enough to fit onto the tang so when you hammer-in the spacer you do your imprint the edges of the pipe you use to clear the length of the tang for the hammer
- Self adhesive sanding paper in about #240 and #400 (or even higher) grit. Double sided tape might do the job too.
- #40 grit belt for rough shaping of the bolster and handle and #80 grit sanding disc for final shaping seemed to work just fine
Blade No. 1
Removing the old handles was relatively simple as these are not glued on the tang. Usually handles on Japanese kitchen knives are first drilled to nearly fit the blade tang, then the tang is heated to red color and then the handle is 'burned in' to fit the knife. That was the case also here. To remove the handles I have just used a piece of wood longer than the blade, holding the blade against the wood so that the end of the wood would be pushing against the bolster and hitting the other side of the wood until the handle would come off.
 |
| Before I started - original handles and material for the new ones. |
Removing the handle showed that the both tangs had a rather coarse (forged) finish with some surface rust, so I cleaned them a little with a belt grinder.
 |
| These tangs do not look too nice, Let's clean them a little. |
Once the shoulders were squared-up I have used masking tape and some carpet tape to cover the blades. before I would proceed.
 |
| Shoulders squared up, tangs cleaned. |
 |
| Squaring up the shoulders on the tang. |
 |
| Choils rounded with a belt sander. |
Then I realised that I should have also rounded the spine (it hat really sharp edges), so I have removed the tape and used the A100 belt to ease them. I did not completely round the spine as I want that it can offer more support should more pressure be needed later when this knife will be used.
 |
| I forgot to round the spine, so let's do that. Belt: 3M Trizact 'Gator' A100 |
Now I have moved ahead and finished the first bolster-fit.
 |
| Fitting the bolster. |
Once the bolster was in place and its front facing surface finished to about 800 grit it was put back on the tang, painted with a permanent maker, marked and ground to shape with a #40 grit belt.
 |
| Bolster rough shaped to slight over-size |
I then shaped to bolster to an approximate octagonal shape. This is still over-sized, but I wanted to minimise the amount of the brass to be removed before the handle will be glued as a lot of heat is created in the process and brass trasfers it very fast what could damage the epoxy joint.
 |
| Bolster roughly shaped |
Once the bolster was ready the handle block was squared-up, marked and drilled (3 partially overlapping holes with 4 mm diameter). I have used needle files to get the tang to fit and it was a slow. process. I have since ordered needle rasps which make the process much faster. I actually had to burn-in the last few milimeters what was a slow process with this dense and hard wood.
 |
| Fitting the handle block onto the tang - not quite there yet. |
 |
| Finally - the handle block fits tightly onto the tang. |
 |
| Handle rough shaped. |
 |
| Filing the notches into the tang |
 |
| After gluing - cleaning the joint before the handle will be sanded to shape. |
Once the glue has cured I have cleaned up the joint with a belt sander and moved to disc sander with #80 grit to first flatten all sides. Once that was done I would measure the handle and draw the lines to first get the distal taper (vertically and horizontally) before moving to final shaping of the handle.
Sadly, I have found out that I did not do good enough job of fitting the handle onto the tang during gluing resulting the handle sitting under an angle against the bolster what resulted in an obvious gap on the upper side of the handle. Lesson earned - take more care next time.
 |
| Flattening the handle sides before moving to final shaping. |
Once you start grinding the brass bolster in the proces - keep checking the temperature as the glue joint could be damaged or get loose.
I would stress that it is important to take the handle into you hand and check whether the shape and size is right. I needed several iterations to get the size that feeled 'right'. It is way to easy to make the handle too large.
 |
| In the middle in the final shaping - still not quite there yet. |
 |
| And this is how a poor handle glue-up job looks like. See that gap on the top? |
To get the job done I have used a small woodeb block of about 10 x 3 x 6 cm and self adhesive sanding paper from 3M (Gold Stikit) in #240 and #400 grit. I would attach a piece of about 10 x 3 cm to the block and sand each facet of the handle.
Important: Since you have thick bras bolster next to much softer wood, you may sand a 'dip' in just before the brass. To avoid that I would first sant just the wooden part and skipping last centimetre and the brass bolster. Then I would switch to much smaller piece of wood and use only about 2 x 4 cm large piece of sandpaper and sand only the bolster WITHOUT leaving it - so that I would not sand in that dip.
I also use the #240 grit to ease the edges on the brass bolster.
Once I was done with #240 grit I would do the same with #400. In the future I plan to use normal sanding paper together wit 2-sided tape as I would like to go higher than #400 grit - in particular because of the bolster. The wood does not really need it.
Final finish would be done with steel wool and then the handle was off to the first coat with Tung Oil.
 |
| Applying first coat with Tung Oil |
Blade No. 2
The second handle was made in a very similar way. Here are a few details I have missed to photograph with the first one.
Working on the bolster I went up to 2000 grit.
 |
| Bolster finished to about 1200 before final fit. |
 |
| Bolster after first fitting - you can see the raised area on the right side. |
 |
| Bolster removed after inital fit - you can see how the tang shoulders pressed themselves into the brass. |
 |
| Bolster re-finished to 2000 grit. |
Then followed rough shaping of the bolster and drilling of the handle block.
 |
| Bolster ready for rough shaping. |
Important: When dry-fitting the handle to the tang&bolster watch that the handle is in axis with the knife. If it is not you have several options to correct: sand the front face of the handle (where it will contact the bolster), file the tang opening, or bend the tang a little.
 |
| Reading for gluing of the handle. |
The clamping solution worked even though it needs some improvements - ideally a small dedicated vise/clamp as it was a little clumsy this way. The point is - make sure that there is not gap between the bolster and the handle.
 |
| Using 2 clapms to make sure the fit is tight. Only little force was applied. |
Once the glue was cured the handle could be rough and the final shaped.
 |
| Drawing the lines for rough handle shaping. |
 |
| Handle rough shaped and ready for final shaping. |
Lessons learned
Quite a few this time, actually...- Make sure you have all the adjustments made to the blade necessary or intended (choil or spine rounding, straightening of the blade, re-finish of the blade) before you start working on a handle. I did not want to re-work the blade finish what made fitting the bolster harder as the tang did not have a well defined shaped.
- When drilling the opening in the handle for the tang drill 1 cm deeper than you need and then keep adjusting the opening with files or rasps until you get a comfortable fit without too much wobble. If the fit is too tight you may have hard time gluing the handle tightly to the bolster (see above) without any gaps.
- Be super careful when shaping the handle already glued to the knife - think how much work it would be to remove it if you make a mistake ;)
- When hand sanding the the handle make sure that when you sand the bolster you do not run on and off it with sanding paper as you will tend to create a dip just behind bolster. Keep the sanding block over the bolster while sanding (or avoid the bolster all together while sanding back part of the handle
- If you plan to finish the bolster to semi-mirror polish with a steel wool, than you want to go to about 1200 sanding paper before that.
- Honestly - I am still figuring out how to finish the bolster evenly. The problem is - you finish the front side first, than you finish the sides during hand sanding, but you also need to round the edges of the bolster and ideally you would want to blend it all together.
- If you plan to use steel wool it may be good idea to put some tape on the front side of the bolster and on the transition from the bolster to the blade tang as the steel wool tends to get everywhere, it will stuck to whatever tiny bits of epoxy are left at that joint and it will be hard to clean afterwards.
- Shorten the handle before you start to sand it to shape. I forgot that with the first one. Also - you can use the rest of the block to test different finishes. Just finish it the same way as you plan to finish the handle.
- When power-sanding wood be careful not to burn the wood, Not only you may damage the wood (if you are close to final finishing), but even more importantly you will clog the belt or sanding disc in no time.
- If you plan to make similar kind of handles where you fit the tang of the knife in relatively narrow opening - do get a few needle rasps - the 160 mm long ones from Corradi are perfect for the job. I just got them and only briefly testing them and they will speed up the job considerably.
Please do not hesitate to ask questions - I love questions :)
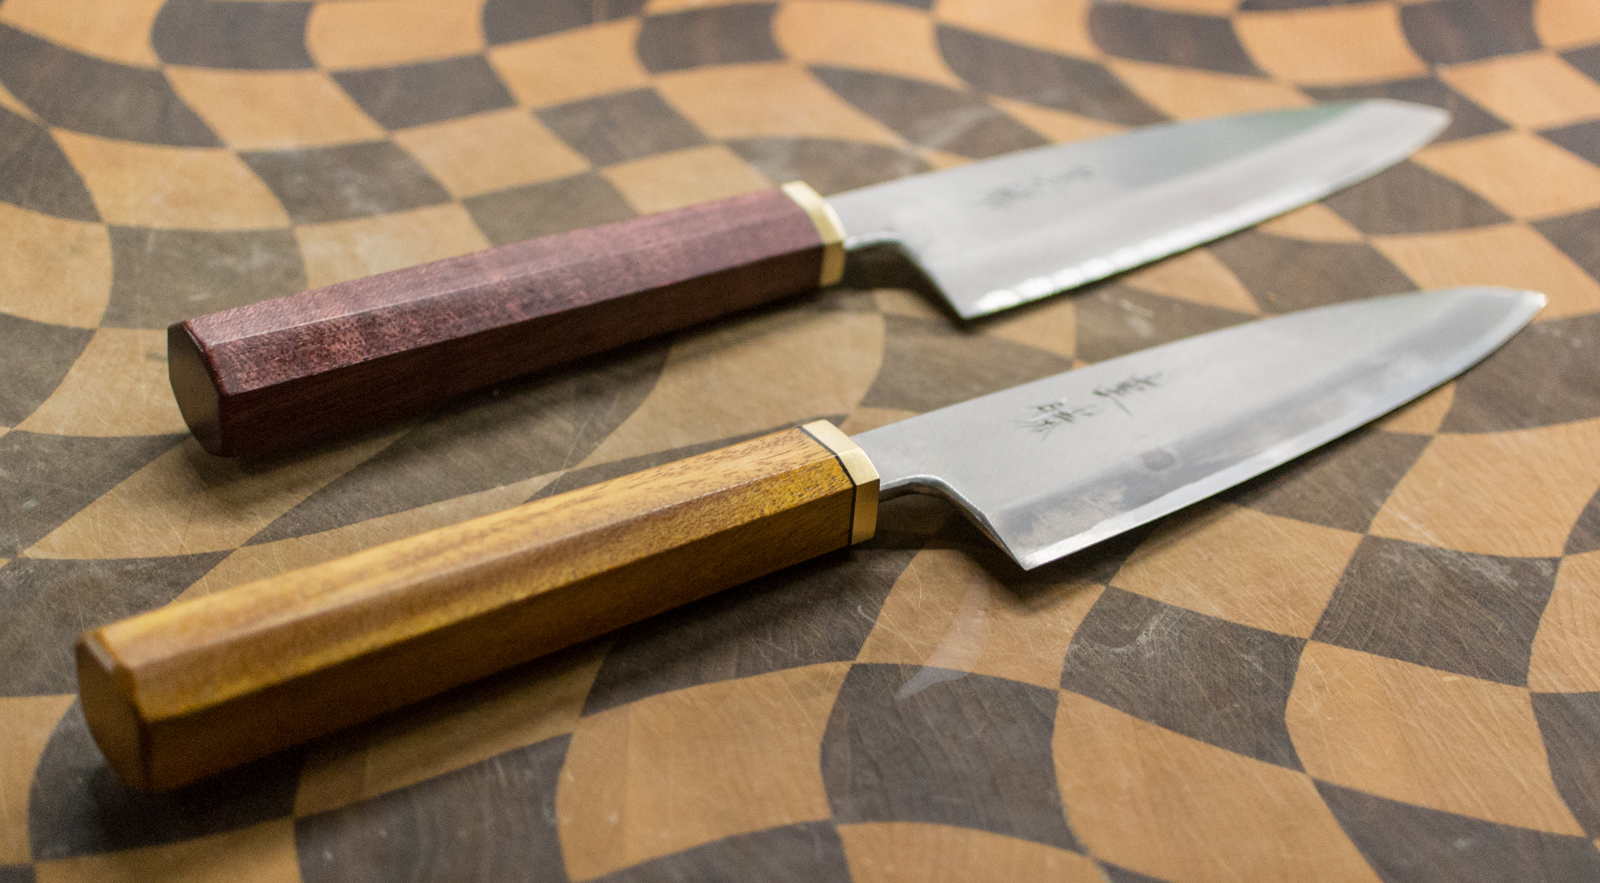
Finished knives
In general - far from perfect, but they do look nice, feel nice in hand and will most certaily serve their purpose. I do have a lot to learn.

 |
| And here is that gap again. It is going to haunt me for quite a while I guess. |
