Showing posts with label handle. Show all posts

Saturday, January 13, 2018

Project #25 - 150 mm tall petty from 1.2442

This was one of the fastest projects I have finished till today. A friend of mine who got a Moritaka AS 150 mm petty just a few months ago managed to bend it at work (while cutting !) and was in a need of a stronger & stiffer petty.

Since we have some experiments with 1.2442 steel in mind for the near future, I offered him that I could make him a petty from this steel as I have not used it yet (though I bought it about a year ago).

From the design point of view the idea was simple - ca 35 mm tall, 150 mm on edge, WA handle.

The blade

As usually, I have started with the blade design. Here I have decided to use the profile (of the cutting edge only) of a Yoshikane SLD 150 petty, which has proven to be very practical. I have then adjusted the height as the Yoshi is only about 30 mm tall. 

This was the first time I have worked with the 1.2442 steel (not in production since quite a while), which bears some similarities (composition wise) with Japanese blue #1 steel. When cutting the steel with a hack saw one would notice that there are alloying elements present, but it was still easier to work with than for example Niolox, though not as easy as O1.

All of the pre-HT steps were 'standard' ones, so here just shortly:
  • cut out the blank from 2.7 mm thick stock with a hack saw (yes, I leave the tip flat until after HT)
  • finish the profile with a #40 belt
  • clean up to #220 belt
  • paint the edges blue with a permanent marker
  • scribe the center line on both edge and spine (including tang)
  • grind the bevels and distal taper - I went down to about 1 mm on edge to minimize the risk of warping during the HT - I have not worked with this steel before.
  • Finish the profile of the heel (much harder to do after HT)
  • Sent the blade off to HT to Achim Wirtz to be hardened to HRC63

Blade after HT.

After HT I would first thin the the grind down to last 10% (leaving about 0.3 mm edge thickness) with the #40 belt.

Grinding after HT with #40 belt
Distal taper - the tang will be worked on a little later.


Close to final geometry

At this stage I would go briefly to 300 water stone from JNS to check and clean up the bevel grind to make sure that there are no defects like over-grinds and low spots. I was not trying to get the final bevel grind - really just checking the consistency. It all looked pretty good, just at usually the heel was a little thinner last 2-3 millimetres.  I was not trying to get 'perfect' bevels at this stage or even shinogi line.

After that I would proceed with shaping the tip and tang of the blade.


Shaping the profile of the tip (after working the bevel on 300 stone)


Once all the coarse grinding was done (blade geometry, tip shape, tang shape) the next step was scratch removal. During this step I would not worry too much about that bevel I did on stones as I was not trying to get as little as possible material removed. I would proceed with #60 and #120 ceramic belts and then proceeded to 3M Trizact 'gator' A100 belt. The A100 would be around #200 grit and frankly I would have been preferable to have the coarser A160, but it appears not available in 1x30" size. 

Grinding with #60 belt under different angle to remove all #40 scratches.
After the A100 I went  to A65 - always slightly changing directions. At this point I realized, that I forgot to round the choil and spine (ideal point to do that would have been after #120 belt), so I first coarsely rounded the spine with a belt and finished to #1000 grit by hand. The choil was rounded entirely by hand and then also polished to #1000. Once these parts were done I continued with #65 and #45 Trizact belts.

Rounding the choil with #240 grit. The light accentuated the scratches,
they were far less scary :)

At this stage of finish I would normally switch to hand sanding going to whatever grit would look nice (I am normally by semi-matte finish). But I was under a time pressure as I wanted to present the knife to my friend (who did not expect to see it anytime soon). So I took a shortcut. I decided to make  an experimental finish. I had a second session on the stones - this time a progression of 300, 1000 and 4000 and ground the bevel down to is final edge thickness (not more than 0.1 mm before sharpening).

I followed by finishing the blade with A30 belt making sure all scratches are gone. I tried to avoid the bevel as I did not intend to remove any larger amount of material there, just final finishing before sharpening once the knife was completed.

In the process of last scratch removal with A30 belt.

The last step on the belt grinder was made with a fine (blue) Scotchbrite belt. There I just wanted to get the finish a little smoother (the belt is nearly too sharp for that). I knowingly also toughed the the bevels so that I had an even finish on the 'shinogi' line.

Finish after fine Scotchbrite belt. Again - the direct light makes the scratches
to stand out more than they would appear under softer light.
The same Scotchbrite belt finish under different angle

The blade would not be finished without a logo ;) On this blade I only did deep etching with DC without using AC afterward to blacken the logo - as was wished by my friend. I have to admit I like this less obtrusive and will probably stick to it with most of my future knives.

About to etch the logo.
As always until now I have used the Electrolyte 94 as electrolyte, 12V setting on the etcher and etched for 6x3 seconds (e.i. lifting the etching head every 3 seconds so that the gas that is produced in the process can escape and does not cause uneven etching

The handle

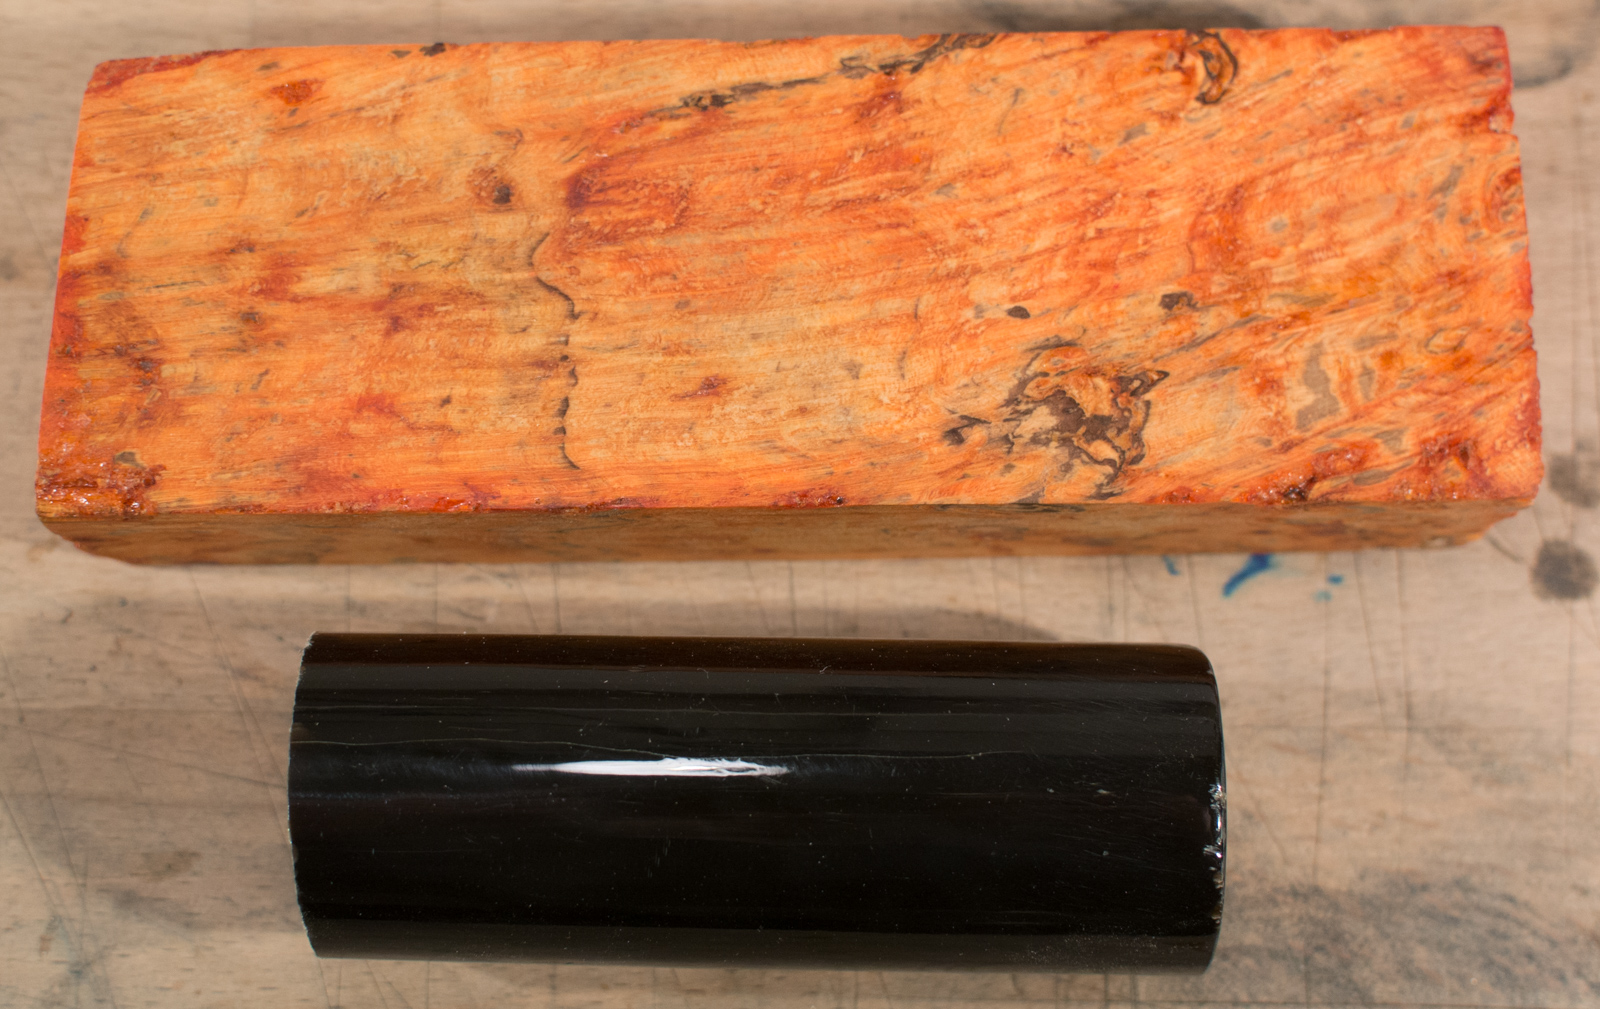
While waiting for the blade to come back from the HT, I would start to work on the handle. The design was again a 'standard' one using buffalo horn for the ferrule and stabilized & dyed Australian wood (curly spalted Boxelder) with a beech dowel inside. Since this handle was a rather subtle one, I decided that apart from cutting the ferrule and handle block to rough shape with a band saw, I will do all the shaping & sanding by hand on a stone sanding block.

Handle materials

The basic process of the handle making:
  • cut the & square up a piece of buffalo horn and handle block
  • drill the ferrule and handle block
  • check that the handle block axis (defined by the drilled hole)aligns with the ferrule & glue them (using my own gluing press that allows using a piece of dowel material for initial alignment)
  • Once the glue cured clean & square up the future handle

Handle components cuts and squared-up

Gluing the handle using a jig. The dowel is
removed once the handle is clamped down.

Normally I would glue in the devel before I would glue the handle parts together, but this time it took longer to get the blade back from the HT and I did not want to loose too much time, so I glued-in the dowel at a later stage (when the blade was back and I could test the fit).

Handle squared-up after gluing and ready for shaping


Normally I do the rough shaping (= final height and width including distal taper) with a coarse belt, but I decided to do this completely by hand. I would do this on a #80 grind sandpaper taped flat on a stone (old table-top)

Handle after coarse shaping
Once the desired height and width (with about 1 mm in every direction left for further sanding) was achieved, I continued through 180, 320 and 600 grits.


Coarse shaped handle refined to about #600 grit.

In the next step I have sanded the handle to octagonal shape. Again - this is something I usually do with the little disc sander that is part of my belt sander, but I simply wanted to do it by hand. This is an interesting experience and allows to get the feel of how important is even pressure distribution.

Once the handle was shaped and finished to #600 grit the blade finally arrived from the HT and so I could make the fitting dowel for it.

Handle shaped and finished up to about #600

I have to admit that since I got the little Record Power BS250 band saw, the cutting of dowels got so much easier. Once the slit was cut it gets widened on a belt sander (#80 or #120 belt seems to work the best) until I get a nice, easy with with the tang and the handle


Dowel cut, now the slit will be widened with a belt sander.
As you may see in the photo below - I tend to make the dowel some 5 mm longer that the drilled opening in the handle - the reason is, that the front side of the dowel might have suffered uneven grinding with the belt sander, or it might get sanded by a rasp after gluing. So I rather make it a little longer and then sand to length after gluing.

Checking the fir.

Once the dowel fits nicely I glue it inside the handle with epoxy. I tend to create small 'pockets' (dips) on the side of the dowel with a round file so that if there is a bit too much epoxy it can go there instead inside the slit itself. You really only want to use just a little epoxy at this stage, because if too much of it leaks inside the handle you will spend a lot of time with needle files and rasps trying to get it out.

As always I use a piece of scrap steel shaped like a very thin edge to push the dowel open while the glue cures, so there will be no gaps between the dowel and the ferrule.

Gluing the dowel

Once the handle was finished this far I tested a little more to see how it feels in hand (with the blade inserted) and got the impression that while I like the overall size and shape, it would feel more nimble if it were a little narrower in the front. I have have covered most of the handle with tape (remember, it was already sanded to #600) and used #180 sandpaper to give a bit of horizontal distal taper to the ferrule.

About to start sanding the distal taper.
Thanks to the fact that the handle already had a #600 finish, it was very easy to observe where the material was being removed. I started by tilting the end of the handle upwards very slightly and applying pressure only on the very front of the handle. I would stop after every few passes and check the progress. Once I have established a new bevel I would continue until it reached the end of the ferrule. I would constantly check and if necessary compensate any unwanted tilts.

After first few passes - looking good so far.

The horizontal distal taper sanded in.

Once the taper was sanded the whole handle was finished up to #1000 grit and the front and rear edges were chamfered. I also used steel wool when finishing the handle, but it was not a particularly good idea with this wood which has a somewhat coarse and not homogeneous structure and the steel wool would tear little pieces out. 

Front side of the handle sanded to #1000 and the opening lightly filed
so that the shoulders of the blade would fit nicely.

Because of the slight tear-out I have the handle once coat of Birchwood Sealer & Filler, sanded it lightly afterward and followed with 2 or 3 coats of Tru-Oil for a good measure. As always, I would apply the Tru-Oil and while & polish the handle with a paper towel immediately after the application.

Tru-Oil curing after application.

At this stage both the handle and the blade were finished (the blade will still get slight refinishing of the bevels on stones) and thus ready for gluing.


Well, let's do the last step.
As with the last few handles I would heat up the G/flex epoxy to make it easier to get it inside the narrow tang slot, then heat up the tang of the blade and insert it carefully. Once the epoxy started to come out I wold let the blade to sink in the handle slowly while wiping the excess epoxy. Since I use G/flex which has 45 minutes pot time I did not have to hurry and even had time to take some photos :) Once the blade was in place I would heat the top of handle gently with the hot air gun to allow most of the bubbles to escape.

I have used small pieces of paper towel wound round ice stick and dipped in Toluene to clean up the blade and ferrule from epoxy rests.

The handle is in place, the last bit of epoxy is still to be cleaned off.
Gluing the handle this way also means, than more often then not the epoxy will shrink a little while cooling down (some air bubbles always remain trapped inside) and thus a shallow void between the dowel and the blade would appear. This is is filled with epoxy (Blade Bond Ultra that has pot time 15 minutes) the next day in a similar manner - the mixed epoxy is heated up and just very little of it is applied to the contact area between the blade and the dowel. Heating the applied epoxy with the hot air gut would allow it to fill the narrow void and the bubbles to escape. This time however I would wait until the glue starts to set it (get thicker) and only then I would use clean the rests off (paper towel, ice stick and Toluene). If I were to do it too soon, I would risk 'sucking' out the epoxy from the freshly filled void. The reason to use different epoxy is that I do not want to wait for an hour for the epoxy to start to set it :)

Gap filled with the epoxy, the excess was already removed.
After last clean-up of the bevels on the stones the knife was officially finished.

Finished knife


Lessons learned

Not so much went (thankfully) wrong this time
  • 1.2442 steel was nice to work with (in comparison to Niolox every steel feels nice to work with though) 
  • The "narrow wide bevel" grind appears to work very well (feedback from my friend)
  • The gentle horizontal distal taper improved the feel in hand considerably
  • I am very happy how the belt finish turned out, but I have a lot of room for improvement (the finish and the efficiency) there. I will need to experiment with different belts to get the most out of it. I plan to make this simpler but very functional finish in the future more often (not only on Niolox)
  • I may be doing more knives like this one in the future. In general I will probably start to make small batches of knives once I get a knife that I (and in particular my test users) like.
  • Again - I was in a hurry to finish this knife and so I did not make proper photos or a video. I need to improve on that.

Wednesday, July 19, 2017

Project #21 - Damascus paring knife

Note: This is a long one, get a nice cup of tee before you dig in :)

Another custom order - this time making the knife a little more fancy was part of the request. Also - the person (or should I better say the couple) ordering the knife were inspired by the parers made by Del Ealy (who's work you definitely check out) and handles by Oatley Knives. And while I was not attempting to copy any of the two makers (nor would I be able to), some traces of their designs can be seen in this work and I wanted to state that clearly.

The idea

The knife was supposed to have the following features:
  • Stainless damascus blade of ca 100 mm length, 
  • Colourful, D-shaped handle with tapering

Materials

Once the selection process concluded, the following materials were selected:
  • Swedish Damasteel 
  • Stabilised blond ebony ferrule (X-cut)
  • Stabilised & dyed Maple Burl (both from Stabwoodlab)
  • 'Some' sort of spacer (later I decided to go with a thin white G10)
Stabilized blond ebony and stabilized & dyed maple burl.
Damasteel stock. This little piece of steel was nearly 90€

The blade

Design of the blade shape went in several steps - below are just last 3 designs. #12 was the selected one. Not shown in the sketch below is the hidden tang.

Since this blade was considerably different to what I have done before + I wanted to be sure that the proportions (in particular the width of the handle) will sit well in hand, I also did the same blade from Niolox steel (I will eventually finish that one too and gift it to my mom :) ) before I proceeded with the rather expensive Damasteel. The main difference being that the Damasteel stock was 3.2 mm thick, while the Niolox only 2 mm. I would have actually preferred the Damasteel to be thinner as for a knife this small, the 3.2 mm was simply overkill.


In the process of handle-making (since D-shaped handle was also something new for me) I have made 2 testing handles from beech wood. I used then one of these as working handle while grinding the blade.

 After cutting out the Niolox blade and testing how it feels in hand (with that testing handle) I then proceeded with the Damasteel.

Stock Niolox and the blade design.

Filing the shoulders with the help of a filing guide.

Above: Damasteel stock, Below: Niolox blank
Damasteel blank ready for bevel grinding.

Once the blanks were ready there was one more test to be done - etching of the logo. I did not know how the Damasteel will react to etching. Since the whole surface of the knife would be ground during the bevel grinding I could test-etch the logo without causing any harm to the knife.

I did etch tests - one just a surface (black) etch with only 10 x 3 seconds AC (12 V) and one including a 10 x 3 seconds deep etch first.

Making the surface etch.
As one could expect, the surface etch (left one in the photos below) was cleaner and sharper, but would be easier to scratch weaken with subsequent light sanding with steel wool. The deeper etched logo was not quite as sharp, but was much more scratch resistant.

Right after etching:
Left: Black etch only
Right: Deep etch + Black etch.

The same two logos as above, but after some steel wool polishing.
The deeper etched logo looks much better.

As usually I would clean up the edges on the blanks up to about 240 grit, then painted them blue with a permanent maker and scribing a centre line on both spine and edge.

Getting ready to scribe the centre lines on the blanks
 Once both blanks were prepared I would always first do some test-grinding on the Niolox and then proceed with the Damasteel.


First grinding of the Niolox blade. You can see the blued edge and centre line.

First grind looking rather consistent. I must be slowly improving :)
Once the bevels were set I have used the filing guide while grinding higher up the blade face. The reason were to eliminate the possible slipping and grinding-off the shoulders of the blade. It was indeed a bit awkward, so I did not use it after HT for further grinding.

Using a filing guide while grinding the bevels.
Before the blades would be sent off for HT I would grind them up to #120 grit. Since I was a bit paranoid about the Damasteel blade getting bent during the HT, I have left the edge about 1 mm thick.


Blades back from the HT. The 'black blade' is from 80CrV2 carbon steel
and was quenched in oil, so it is covered in scale.

After HT I would continue grinding with #36 grit belt. Once the edge thickness was at nearly 0.5 mm I switched to #60 belt and slightly changed the angle, made sure that all #36 scratches are gone, and went to #120 belt and repeated the process.

About to start grinding after HT.
In principle I could have continued with finer belts or hand sanding, but I have decided to finish the bevel setting and scratch removal on stones. Since Damasteel proved rather easy to grind and sand, I have moved directly to AI#1000 (that is probably the fastest 1000 grit stone there is). Doing so gave me a lot of control over where the blade would be ground and thinned and I would also make sure that there are not hidden low spots left. I would like to stress that at this stage I was not after an even finish, just a complete scratch removal from the previous step and fine tune the blade geometry.

Once I was tone with the #1000 stone I moved to Gesshin #4000 as a final stage of the work on stones. The Gesshin would leave me with seriously patchy finish (not a stone's fault, but it is not easy to get a smooth finish on a curved surface on a hard sharpening stone), but that did not matter since I the surface finishing was going to be made with high grit sandpaper.

Tip: The grit rating of sharpening stones and sandpaper is different. #1000 stone will give you finish somewhat comparable to #400 sandpaper. Trying to go from #1000 stone to #1000 or even higher sandpaper will not really work.

Gesshin 4000 - nearly milky white before you start.

4000 stone finish

Cayin N3 player, Music Two custom monitors from The Custom Art
and a load of freshly converted FLAC albums made the hand sanding
nearly a positive experience :)

Here you can see the rather uneven 4000 stone finish.

Before I continued with the finish of the blade I have rounded the spine (with a A65 ) and choil area and finished it up to #2000 grit paper. To finish the choil I have used a wooden stick (12 mm in diameter, the one I use to make dowels) as a support for the sandpaper.

After the stones the blade had final geometry and close to 0 edge thickness (sub 0.1 mm, some burr was already raised) I moved to hand sanding. I have started with #1200 sandpaper, but then moved one step back to #800 - and after a few minutes, once the blade started to clean up - I have discovered a few faint scratches from the #120 belt. I was not pleased.

To get a smooth finish on the convex grind of the blade I glued a piece of mouse-pad on a piece of wood.

There it is - a faint scratch from the #120 belt.
it turned out that I was lucky and I actually managed to remove those scratches with the #800 sandpaper. This would have not been possible with a Niolox blade.

Once I was done with the #800 sandpaper I moved to #1200, #2000 and finally #2500. The #2500 sandpaper gave me a semi-mirror finish - definitely smooth enough for etching.

One side finished up to #2500

This is what I call semi-mirror finish.

Once the first side was done I re-taped the blade and started to work on the other side. The tape provided near-perfect protection of the finished side.

Putting and orange Tesa masking tape on the blade to protect the
already finished surface.

Etching

Once both sides were finished it was time to etch the blade to reveal the damascus pattern - which was barely visible on the polished blade. After reading around I proceeded as follows:
  • Clean the blade with acetone
  • Clamp the blade in a lockable pliers (O forgot to drill a hole at the end of the tang)
  • Insert the blade in a 37% solution of HCl for 5 minutes
  • Once finished neutralize the reaction with a saturated solution of kitchen soda
  • Was the blade with soap and water

Of course I did this on a balcony with full protection gear - respirator, full face shield and gloves that are made for handling chemicals. Better safe then sorry.

After etching one would normally sand the blade, but since the result looked really nice I skipped that. The 5 minute etch gave the blade a rather deep etch - next time I would use 2 or 3 minutes.

Etching of the logo was a simple and fast procedure - after cleaning the blade I would first etch the logo a little bit into depth with 6x3 seconds of 12V AC and then blacken it with 6x3 seconds of DC. Done :)

Important: One thing to watch out for when etching a logo with stencils as below, is to make sure, that the edges of the logo and taped well and that no etchant and no current will find its way around the edges, as that will leave black streaks or line around the logo.

Stencil with the smaller version of my logo taped in place

Freshly etched logo.

At this stage the blade was finished and the last step to make was to sharpen the knife - this was done after the handle was glued on.

The handle

Once the blanks were shaped I could start in parallel to work on the handles. As already mentioned, I have first made 2 prototype handles - the first was also drilled, the second only shaped. The main reason was that I was not sure how well will I be able to get the palm edge of the D shape ground and how the finish (sanding) will go.


Drilled beach block, ca 10 cm long


Coarse shaped block with slight distal taper both in height and width.

Rough shaped handle.

Checking how the handle sits in hand.


Once I had a rough idea how to proceed with the handle making I started as usually - squaring up all the handle components. The main reason for the squaring up is to be able to align the block while drilling and to get the best possible alignment of the handle block and the ferrule.

I usually start on #80 grit sandpaper taped on a piece of stone (originally part of a small serving table). Once I get the block roughly squared up, I continue with #180 sand paper. I do not go any higher - not even with the surfaces that will be glued - to get the best possible connection between the glued surfaces. If I am adding another material that has glossy surface (metal, G10, micarta), than I will roughen it up with #180 sandpaper before gluing.

Last visual check of the handle materials. I have poured some ethanol
over the blocks to allow the colours to stand out.
Machinist square is a must for me here.

I love the different colors of the sanded wood.
Once the squaring up is finished, the next step is drilling. I check how deep the tang is and add about 2 more cm for the dowel. This is a small knife, so I use a dowel with 10 mm diameter. Since this knife was going to have a 'hidden dowel handle', when drilling the ferrule I drilled first the centre hole with just a 2 mm drill, then drilled nearly the full depth with 10 mm drill (I left about 5-6 mm material). Then I drilled another two 2 mm holes that would align where the opening for the tang would later be.


Drilling the dowel opening on the handle block. I always enjoy
drilling the dyed woods :)
The handle materials. The ferrule has only the first 2 mm hole drilled.

Filing the tang opening on the ferrule (first connecting the three
2 mm holes with a needle file)

Making a dowel - first cutting the beech with a hack saw ...

... then widening the slot with a #80 belt until the tang would fit.
This would be checked with all the components assembled.

Nothing is glued here yet - just checking that all parts fit together before
I would start to glue the handle.

Once all the handle components were ready, I would first glue the dowel inside the handle block with a 5 minute epoxy (I did not want to wait to the next day to continue). I would use a piece of scrap steel (shaped like a very long and narrow triangle) to keep the slot in the dowel 'opened' while the epoxy cured. In the next step I would use G/flex epoxy to glue the remaining components into one piece.

Note: Of course - one could glue all the parts together - on the blade tang - in one step. But I still do not dare to shape the handle with the blade in place (unless there is no other way), plus in this case the blade would be getting in the way of shaping the handle. So I do it the round about way.

Once the glue cured I would cut off the excess wood (the block was wider than necessary for the handle, but I prefer to keep it that way up to gluing), grind it to shape and hand sand it on a sanding block up to #180 grit. I would also check whether the blade can be inserted. Often small bits of glue leak in the dowel slot and need to be removed with a flat needle file or rasp.

Cleaning and then squaring up the handle block after gluing. 
Before I would proceed with coarse shaping I would insert the blade and check for alignment. if the blade would not be aligned with the expected axis of the handle If the blade would not be in line with the expected axis of the handle (I know the middle point on the bottom side of the handle as I marked it with a tap before I started to drill) I would re-draw the axes to make sure that the further shaping happens around the axis of the blade.

Checking the blade alignment relative to the handle.

Cleaning up the block on #80 and #180 sandpaper.
At this stage the handle was ready for the coarse shaping - that means I would draw lines on all sides of the handle that would reflect (slightly oversized) future taper of the handle. In this case the taper was not supposed to be too pronounced. I would do the coarse shaping with a #40 belt and then clean up the blade again by hand with #80 and #180 sandpaper.

With the handle ground to tapering shape and with all unnecessary excess material removed I would start with final shaping. For that I use (for now) the 125 mm disc sander that is part of my 1x30" baby grinder. I have used a zirconium #150 grit disc. One could get the job done faster with #80 grit, but it also becomes easier for the disc sander to 'grab' the handle out of my hands and send it flying across my shop. Anyhow - I always use a full face shield when working with the disc sander, even though it is a tiny one.

Note: This sort of handle shaping could be done with more control on a universal (= capable of vertical and horizontal position) large grinder, but since I do not have that option for the moment I am  trying to get most from what I have.

Handle is ready for final shaping. D-shape please!
I have to admit that I was very nervous about the final shaping - it is so easy to make a mistake when you are nearly finished and grind off a piece of that facet that defines a D-shaped handle. But I really have to say that I managed to stay cool and ground the handle to shape without any serious problem.

Fresh off the disc sander, the taper at the front side of the ferrule is still missing.
Info: I did one process mistake. This handle was requested with a single facet on the right side - tapering the handle width towards the blade. Without thinking much about it, I ground this facet right after I was done with the handle shaping. This made the subsequent hand sanding (up to #1000 grit) much more complicated, as I had to take care of the additional edges.

I would have made more sense the sand the handle up to final grit and then grind-in the facet and refinish only the facet. It would have made it easier to keep the edges cleaner and sharper.

Once the handle was finished I have applied several very thin (just applying and immediately wiping dry) coats of Tung oil and then lightly sanded with a 0000 steel wool. Finished :)


Finished handle. Oiled, but not sanded.
Finished handle. Oiled, but not sanded.

Finished handle. Oiled, but not sanded.

Finished handle. Oiled, but not sanded.

Finished handle. Oiled, but not sanded.

The very last step to do was the glue the blade inside the handle and sharpen the knife.

Gluing the handle.

Finished knife

Far from perfect, but still very rewarding:


Lessons learned

  • Accepting a custom project that lies far beyond your current set of skills will take very long to finish.
  • Test any new process step before you apply it to the product, or make sure that you can redo it with reasonable amount of effort and expenses.
  • Custom projects are fun, but very time consuming. They are a challenge and the customer should be made aware of that and adjust his/her expectations on timing accordingly.
  • The more outside your skill zone the project lies, the less 'perfect' the result is going to be.
  • The more open & communicating you are with your customer, the more understanding will he/she have when unforeseen problems cause yet another delay.
  • If you plan to make a new shape of handle, write the whole process down and see whether all steps make sense and are doable with your set of skills and tools
  • I have 'discovered' finishing the grind of the knife on stones and will continue using this technique. As of now I have another 2 blades that have seen this treatment and I am pleased with the result.

I would like to finish this long article with a big Thank You to my customer who not only showed active interest in the whole process (we exchange a few more than 100 emails), but also granted me all the time I needed to finish this project. It all started back in March 2017 and was finished in July 2017. My original estimate was "it will take at least 3 months" - it seems I was right :)