This project was commissioned at the same time as the project #15, but here I was given a 'free hand' on the handle materials and design. I could not resist to try something new - see below how did that work out :)
The knife in questions is a small mukimono made by Shinichi Watanabe. It had a 'standard' burned chestnut D shaped handle and so the handle removal was very simple, since these are not glued on, but just burned-on the tang.
Design & Materials
For a long time I have concentrated only on natural woods, but I was always attracted to dyed materials. I have recently bought a few blocks from different sources and this handle was a good opportunity to test one of them.
I have also wanted to try water buffalo horn (a 'standard' ferrule material on traditional Japanese handles) as well as some metal spacers. So the final selection was:
- stabilized & dyed maple burl (from stabwoodlab)
- water buffalo horn
- black fiber paper spacers
- 1 mm thick nickel silver spacers
 |
| Starting point - original handle and materials for the new one. |
The handle block
Before I did the easy part - square the wood up, clean the gluing side of the horn, cut the pieces of fiber paper and nickel silver and glue them all together - I considered different options on how to deal with the fact, that there are metal spacers that need to be drill in some way.
- One option would have been to drill all components beforehand and glue them directly with a dowel (that would not have a tang slot at that point) and then drill the tang slot afterwards. Doable, but because of the thinness of the blade the making the tang slot would have been a lengthy job.
- I have decided to go with second option - glue all the components together and do the drilling afterward. I will discuss the pluses and minuses later. I have used BladeBond Ultra epoxy for the first time here (will be relevant below).
- Third option that did not come to my mind would have been to drill the holes in the horn, nickel silver, fibre paper and a shallow hole in the wood, than make a shot (1 - 2 cm) dowel from soft wood that would only serve to align all the parts and would be later drilled-through with the same drill bit to allow to mount a slotted hardwood (beech) dowel.
 |
| About to glue it all together. |
 |
| Gluing the handle block |
 |
| Ready for the next step. |
 |
| Glue excess ground off, ferrule shaped to align with the rest of the block. |
Once the handle was glued I cleaned the block up (remember, it was already squared up before gluing) and drew centre lines on all sided, top and bottom. I also gently tapped the bottom to keep the track of where the centre was.


After all lines were drawn I realized that I forgot to square-up the bottom of the handle. The point of doing so was to make alignment in the vice for drilling easier.
 |
| Squaring up the bottom side of the handle. |
Drilling the opening for the dowel
Note: Since I did several unfortunate choices in this part of the process, I have decided to describe it in more detail.
As mentioned above - I have decided to do the drilling after all the components were glued together. The main issue to deal with were of course the metal spacers. Even though not too thick, these still needed to be drilled with different drill than the one I normally use (drill bit for wood with the guiding 'tip').
I have first drilled a 'normal' hole with 10 mm diameter (first mistake, I should have started with a much thinner drill bit and use the hole in the horn as guide while drilling through the metal spacers) with the drill bit for wood and swapped to a drill bit for steel (second mistake - apparently not a really sharp one) once I reached the metal spacers.
 |
| Starting to drill - so far so good. |
I have underestimated (third mistake) the amount of heat that will be produced while drilling through the nickel silver spacers. When I was half way through the first spacer I noticed that the handle block is loosing its mechanical stability and a few seconds later the horn cleanly delaminated from the rest of the block. Bummer :(
 |
| And the ferrule went clean-off when the drill bit touched the first spacer. |
 |
| Just drilling a little more to see how the metal spacer holds on the underlying fiber spacer. Poorly. |
Close inspection showed that the glue detached from the surface of the nickel silver (which I cleaned with acetone, but - fourth mistake - forgot to roughen with sanding paper and left it glossy polished).
Checking out the second nickel silver spacer which was sandwiched between to fibre paper spacers showed that this one was already delaminating, even though it had seen only a very short drilling (just the tip of the drill bit). I was able to detach it from both fibre spacers - again - there was no glue left on its surface.
 |
| There is not glue attached to the nickel silver. The scratchy spots are from flattening with a hammer prior to gluing. |
At this stage I should mention that I have used the BladeBond Ultra epoxy (a dedicated epoxy for knifemaking) which I did not test before with the materials in question (fifth mistake - untested glue). Afterward I have used the G/flex with the two spacers just to see how they will hold and looked fine, but I did not try to drill them.
So to save what still could be saved I sanded the remaining fibre spacer off the wood, sanded both wood and horn and glued them together.
Handle shaping
Once the glue cured I have proceeded in the standard way. I prepared a dowel from a 10 mm round beech, cut the tang slot with a hack saw, widened it with a belt sander and #120 belt until it would fit well on the tang and glued the dowel inside the handle block with the G/flex epoxy (wood glue would have worked as well). I have briefly inserted the tang inside and made sure that the blade is under right angle against the upper and lower side of the block. Indeed - a slight rotation could be corrected later, but it makes your life simpler if you do not have to correct this.
Note: Do not use too much glue for the dowel, as it will find its way inside the slot and you will have tough time to file it away so that you can fit the tang inside later.
Note: Do not use too much glue for the dowel, as it will find its way inside the slot and you will have tough time to file it away so that you can fit the tang inside later.
 |
| Once the dowel fits the blade and also the hole in the block (without too much resistance) it can be glued it. |
 |
| Checking handle alignment relative to the handle block after gluing. |
Once the dowel was glued it was time to proceed with rough shaping. But before I would do that I would use a thin needle rasp (which I flattened from one side with a belt grinder to be able to sand tang slots as thinner than 3 mm) and make sure that the blade tang would fit in nicely. Then I would mark the handle with a pencil on the sides of the handle, grind off the excess of the material with a sharp coarse #40 belt, clean up on the disc grinder and do the same for the remaining two sides.
Note: If you are not sure about what size the handle should have when finished, then keep do this in a few steps. Ideally you would get the idea on the size from some other existing handle, as at this stage you can not really test how the handle feels in hand.
 |
| Rough shaping the handle. |
 |
| Rough shaping finished - cleaning up on a disc grinder. |
 |
| Flattening the handle before giving it octagonal shape. |
Final shaping is one of the sensitive steps - I am doing it 'free hand' with the disc sander. I first try to get a reasonable angle, grind just a bit and move to the next 'corner' and work on all sides iteratively until I like the result. The reason for this is that it is rather easy to make a mistake and grind under wrong angle. Since this work does not take that much time, I really recommend not to hurry this step.
 |
| Final shaping finished - next step is handle finishing. |
Once the octagonal shape of the handle is finished, I take the handle to #240 sand paper attached to sanding stone and make sure that all 8 facets are flat and I have removed all the scratches left by the disc grinder.
Note: Be careful here. #240 sandpaper is still fast enough and if you use too much pressure you can easily remove considerably more material than you have planned. Make sure that you apply the pressure evenly left-right and front-back as otherwise you will chance the angle of the facet you are sanding.
 |
| The wide facet has the longitudinal scratches from the hand sanding, the narrow one has still the disc sander finish. |
Once the handle is clean I move to sanding with a small hard wood block ( ca 20 x 60 x 100 mm ) with a double-sided Tesa scotch tape on the narrow long sides which I use to attach different sanding papers. I follow with 400, 1000 and 2000. At each step I round the edges on the ferrule and sand under constant angle the edges on the opposite end.
 |
| After #2000 grit sanding paper. |
 |
| After #2000 grit sanding paper. |
 |
| After #2000 grit sanding paper. |
Note: contrary to sanding paper which can be mounted on hard surface to have a well defined sanding surface, the micro mesh pads are soft. This inevitably means that there will be tendency to round over edges and the only control you have is how long you will be sanding with the pads.
 |
| After micro mesh treatment. |
 |
| After micro mesh treatment. See the dust filled grooves on the ferule? |
Once all the sanding was finished the handle was treated with a board butter.
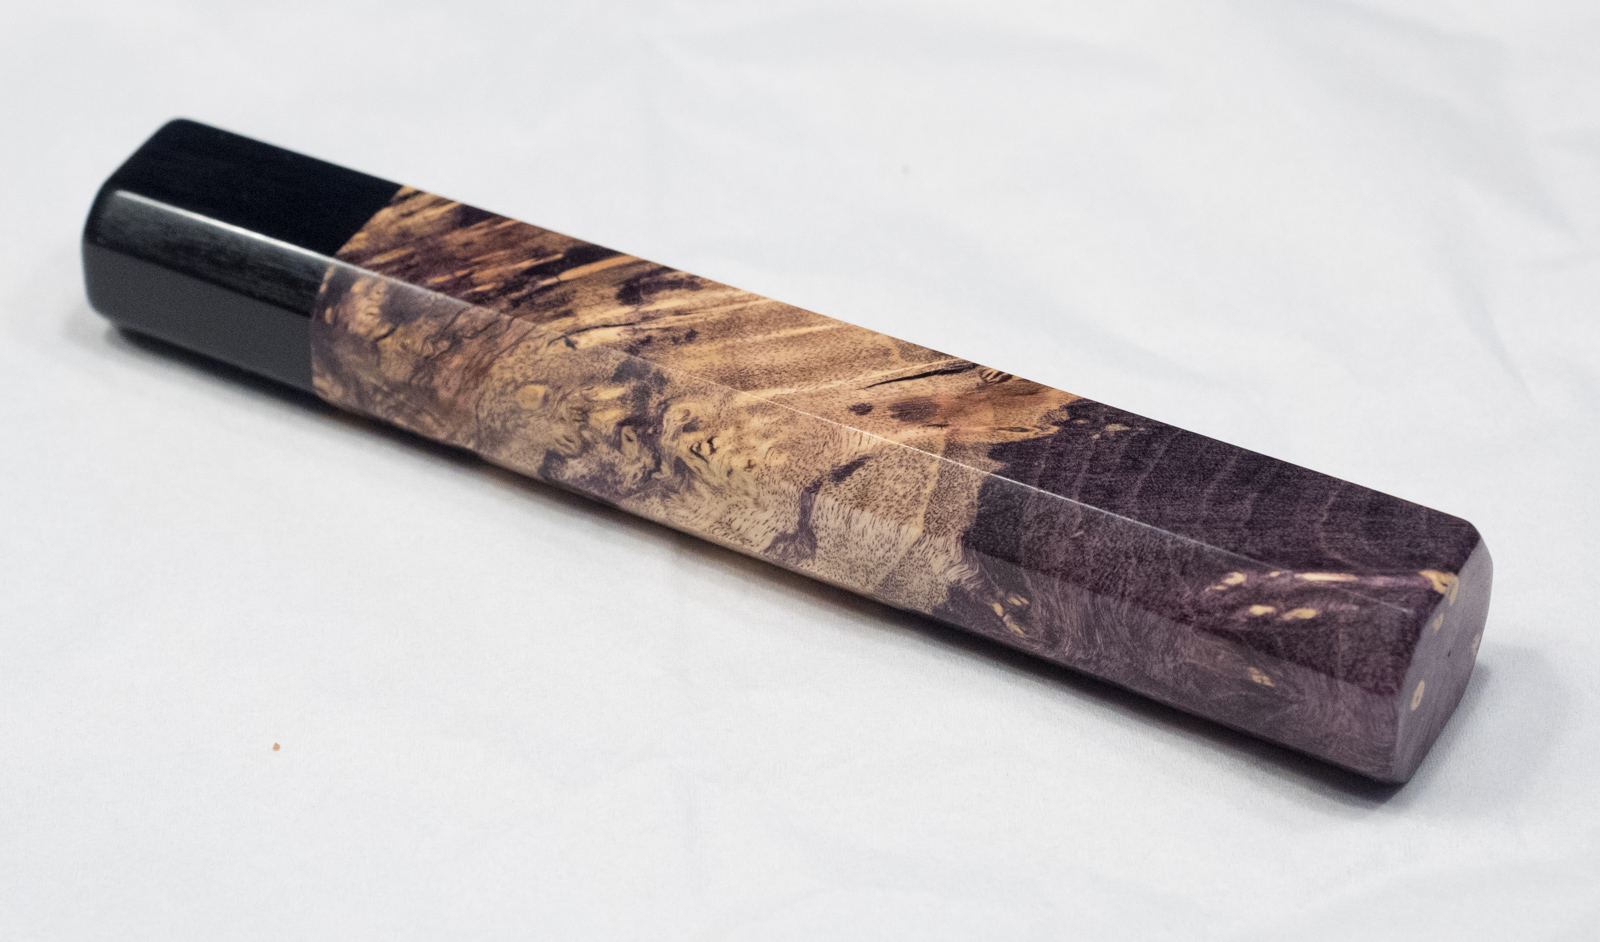 |
| Finished handle. |
 |
| Finished handle. |
 |
| Finished handle. |
 |
| Finished handle. |
 |
| Finished handle. |
The only work left to do was the glue the handle onto the tang. I have used the G/flex epoxy which is fluid enough to (albeit slowly) flow inside the narrow tang slot. At the same time the glue as 45 minute pot time, so you do not need to hurry and once you get the blade in place you have still time to clean all the glue from the blade and the handle.
 |
| Getting ready for the final gluing. |
 |
| Blade is in place, everything was cleaned and looks good :) |
Lessons learned
- Test the process first - see my problems using the BladeBond Ultra epoxy to glue the nickel silver spacers. I suppose this is a mistake on my side (see the test of this glue by Walter Sorrells on YouTube)
- If you are using a new concept for the first time - think it through before you execute it. I did not and at the end I got lucky. I will proceed differently next time.
- Be careful when hand sanding (cleaning up & flattening) the facets of the handle with coarse or medium grit sandpaper - you may remove more material than you expect.
- Even if you have full contact of the flat area with the sand paper, the material will be removed there, where you apply pressure.
- I have used here a new source of stabilized wood (from the xx642011 on eBay - also know as stabwoodlab on Instagram) . It turned out to be of good quality, but should that not be the case, I would 'only' have to make a new handle from a different material. I would have not used material of unknown quality if the handle design would have required to shape the handle after it was glued on the tang.
Finished handle


Good job!
ReplyDeleteThank you for the explanation
ReplyDelete